



Sign up for workout ideas, training advice, reviews of the latest gear and more.


Push-ups are one of the most effective bodyweight exercises for building upper-body strength, core stability, and confidence. They train the chest, shoulders, triceps, abdominal muscles, and even the glutes when performed with strong full-body tension. Yet many women avoid push-ups because the standard floor version feels too difficult or because they have never been shown a realistic progression. The solution is not to force sloppy repetitions. It is to begin with a variation that matches your current strength and follow a gradual plan that improves technique, control, and total training volume.
This 4 week push up progression plan for women provides a practical path from wall or incline push-ups toward stronger knee or full push-ups. You do not have to complete a standard push-up on day one to benefit. Every variation in this program develops the same basic movement pattern, and each week gives your muscles and nervous system a manageable challenge. With three focused sessions per week, you can improve your pressing strength while allowing enough recovery between workouts.
The goal is quality rather than rushing. Some women may complete their first full push-up by the end of four weeks, while others may lower the height of their incline, improve their range of motion, or perform more controlled knee push-ups. All of these results represent meaningful progress. Your starting point, training history, body proportions, and consistency will influence your pace, so use the plan as a flexible framework rather than a pass-or-fail test.
Push-ups build useful strength without requiring a gym or expensive equipment. Because your hands stay planted while your body moves, the exercise asks several muscle groups to cooperate. Your chest and triceps press you away from the floor, your shoulders stabilize the upper arms, and your core resists sagging or twisting. This coordination carries over to daily activities and other exercises, including dumbbell presses, planks, burpees, and bench presses.
Push-ups are also easy to scale. A wall push-up reduces the percentage of body weight you must move, while a countertop, bench, or sturdy step gradually increases the load. Knee push-ups shorten the lever, and full push-ups require you to control the body from head to heels. These variations let you build strength at an appropriate difficulty instead of repeatedly failing at the hardest version.
For women who train at home, push-ups offer an especially convenient way to strengthen the upper body. Lower-body exercises such as squats and lunges often feel accessible without equipment, but upper-body training can be harder to organize. A thoughtful push-up progression helps balance a home routine and can be completed in a small space.
Before beginning the four-week schedule, test the variations below. Select the most challenging option you can perform for five to eight smooth repetitions while maintaining a straight body line and controlled tempo. You should finish the set feeling that you could complete approximately two additional good repetitions. If you cannot maintain form for five reps, choose an easier level.
Stand facing a wall and place your palms slightly wider than shoulder-width at chest height. Walk your feet back until your body forms a straight diagonal line. Bend your elbows and bring your chest toward the wall, then press away. Moving the feet farther from the wall makes the exercise harder. This variation is appropriate for new exercisers, anyone rebuilding strength, or women who need a gentle starting point.
Place your hands on a secure countertop, heavy table, or high railing that will not move. Walk your feet back and keep your body straight from head to heels. Lower your chest toward the surface and press back up. The higher the surface, the less body weight you lift. Avoid light furniture that could slide or tip.
Use a sturdy bench, sofa edge pressed against a wall, or fixed bar. A lower surface increases the challenge because your body is closer to horizontal. This variation closely resembles a floor push-up and is often the most useful bridge to the full movement.
Begin on the floor with your hands slightly wider than your shoulders. Keep a straight line from your head through your hips to your knees. Lower your chest between your hands without sending your hips backward, then press the floor away. Knee push-ups can build pressing strength, but low incline push-ups may provide a more direct transition to the full-body position. You may use either option or alternate them.
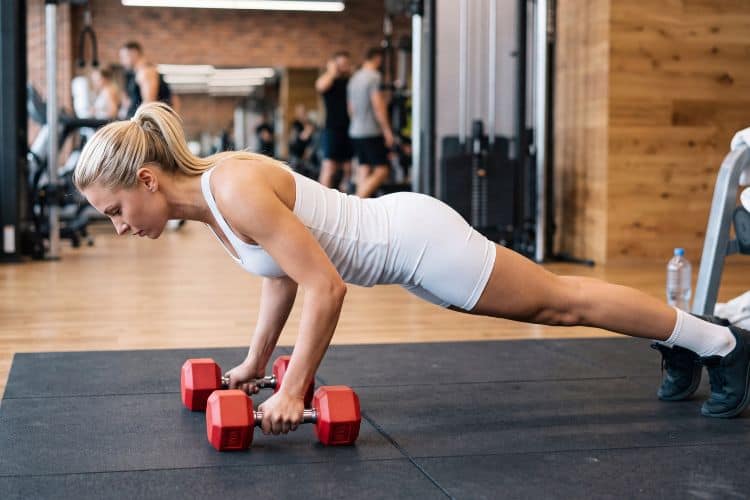
Start in a high plank with your hands slightly wider than shoulder-width and your feet about hip-width apart. Brace your abdomen and glutes. Lower your body as one unit until your chest approaches the floor, then press up without allowing the hips to sag. If you can already perform several standard push-ups, this plan can help you increase your repetitions and improve control.
Set your hands beneath or slightly outside your shoulders with your fingers spread. Grip the floor gently to create tension through your arms and shoulders. Point the elbow creases generally forward and allow your elbows to travel back at roughly a 30- to 45-degree angle from your torso. Elbows flared straight out to the sides can make the position less comfortable for many shoulders.
Brace your core as though preparing for a light punch and squeeze your glutes. Keep your neck neutral by looking slightly ahead of your fingertips rather than lifting your chin. Inhale as you lower under control. Aim your chest toward the space between your hands and keep the shoulders away from your ears. Exhale as you press the surface away.
Your chest and hips should rise together. End each repetition with straight arms, but do not aggressively snap the elbows backward. Use the greatest pain-free range of motion you can control. Over time, try to bring your chest closer to the wall, bench, or floor rather than shortening the repetition to achieve a higher count.
Complete this program three nonconsecutive days per week, such as Monday, Wednesday, and Friday. Each session takes approximately 15 to 25 minutes. Rest for 60 to 90 seconds between sets and up to two minutes after a demanding set. Your primary variation is the level selected during the starting test. When the schedule mentions an easier variation, raise the incline or move back one level.
Stop each working set when your form begins to change, even if the written repetition target is higher. Leaving one or two good repetitions in reserve allows you to practice more high-quality work across the week. If you experience sharp pain, numbness, or joint pain, stop and consult an appropriate healthcare professional. Muscle fatigue is expected, but pain is not a progression tool.
The first week develops positioning and consistency. Begin each session with the warm-up described later in this article. Perform three sets of five to eight repetitions of your primary push-up variation. Lower for approximately three seconds, pause briefly near the bottom, and press up with control. After the working sets, perform two sets of six shoulder taps from a high incline or hands-and-knees position. Count one tap on each side as one repetition. Finish with two 20-second incline or knee planks.
During this week, resist the urge to test full push-ups every day. Repeated failure adds fatigue without providing much quality practice. Instead, make every working repetition look similar. Record the variation, surface height, reps completed, and how difficult the final set felt. By the third session, try to add one repetition to one or more sets only if your form remains solid.
Your three sessions might look like 6, 6, and 5 repetitions on day one; 6, 6, and 6 on day two; and 7, 6, and 6 on day three. Small increases count. If five repetitions are already difficult, remain there throughout the week and focus on smoother movement.
In week two, perform four sets of six to ten repetitions using the same primary variation. Use a controlled two-second lowering phase and press up at a natural speed. Follow the working sets with two sets of three to five slow negative push-ups at a slightly harder level. For a negative repetition, begin at the top and lower for four to five seconds. Use your knees or step forward to return to the starting position rather than struggling to press back up.
Finish with two sets of eight shoulder taps per side and a 20- to 30-second plank. The additional set increases total practice, while negatives help your body learn to control a heavier version. Keep the negative reps low because they can create more muscle soreness than regular repetitions.
If you reach four sets of ten with excellent form, lower your incline slightly during the final set of the third workout. Treat this as practice, not a maximum test. If you complete at least five clean repetitions at the new height, you may use it as your primary variation in week three. If not, remain at the current height and continue building strength.
Week three introduces more work at the next level. After warming up, complete one practice set of three to five repetitions using a harder variation. A wall push-up trainee might use a countertop, a high-incline trainee might choose a lower surface, and a low-incline trainee might try knee or standard push-ups. Stop before technique breaks down.
After the practice set, return to your reliable primary variation and perform three sets of eight to twelve repetitions. Then complete two sets of four slow negative repetitions at the harder level. Finish with two rounds of a 20-second high plank and six to eight shoulder taps per side.
Use the same structure for all three sessions. If the harder variation improves, you can add one repetition to the practice set, but do not turn it into an exhausting set. The purpose is to practice the skill while fresh and then accumulate enough quality volume with the variation you control.
Women working toward their first standard push-up can use a low incline for the main sets and one to three full-push-up attempts at the beginning. If a complete rep is not available, perform a slow floor negative, lower all the way down, place the knees on the floor, and press back to the starting position. Each repetition should remain deliberate.
During the first two sessions of week four, perform two sets of three to six repetitions at the harder variation, followed by three sets of eight to ten at your previous level. Complete two sets of three slow negatives, then finish with one or two 30-second planks. Rest up to two minutes after the harder sets so fatigue does not immediately compromise your technique.
The third session is your progress check. Warm up thoroughly, then rest for two minutes. Test your hardest appropriate variation, stopping when you can no longer maintain a straight body line or full controlled range. This may mean testing wall push-ups from a more distant foot position, using a lower incline, completing knee push-ups with better depth, or attempting standard push-ups.
Rest for three minutes after the test. Then complete two comfortable sets with an easier variation, staying well short of failure. Compare the result with your starting test. Look at more than the number of repetitions: a lower surface, slower tempo, greater range of motion, steadier hips, and less effort all demonstrate progress.
A good warm-up prepares the wrists, shoulders, upper back, and core. Begin with 30 to 60 seconds of easy marching or arm swings. Perform eight wrist circles in each direction, then place your palms against a wall and gently shift your weight forward and back for eight repetitions. If floor positions bother your wrists, keep the warm-up elevated.
Next, complete eight wall slides or controlled arm circles, followed by eight scapular push-ups at the wall or on an incline. During a scapular push-up, keep the elbows straight while allowing the chest to move slightly toward the surface, then push away by spreading the shoulder blades. Finish with a 15- to 20-second plank at an easy incline and five easy push-ups. The entire sequence should take about five minutes and should leave you prepared, not tired.
If the workouts feel too difficult, reduce each set by two repetitions or use a higher incline. You can also complete two working sets instead of three or four during the first week. Build toward the written volume over time. A stable wall and countertop can provide several small progression steps simply by changing foot distance and hand height.
If wrist discomfort occurs, try holding sturdy push-up handles or hexagonal dumbbells that will not roll, which keeps the wrists in a neutral position. An incline also reduces pressure. Make sure the equipment is secure and placed on a nonslip surface. Persistent wrist or shoulder pain deserves professional assessment rather than repeated training through discomfort.
Schedule at least one day between push-up sessions. Strength develops during recovery as your body repairs and adapts to training. Gentle walking, mobility work, and lower-body exercise can be performed on other days, but avoid exhausting chest, shoulder, or triceps workouts immediately before your push-up sessions.
Aim for consistent sleep and eat balanced meals containing protein, carbohydrates, colorful produce, and healthy fats. Protein supports muscle repair, while carbohydrates help fuel training. Hydration matters as well. You do not need a complicated supplement routine to improve at push-ups; regular practice, sufficient food, and recovery provide the foundation.
After your final test, choose the hardest variation you can perform for at least five clean repetitions. Use it for three sets twice or three times per week. Add repetitions gradually until you can complete three sets of ten to twelve. Then lower your incline or move to the next variation and return to sets of five to eight.
If you achieved your first standard push-up, continue practicing single repetitions while fresh. For example, perform three to five sets of one perfect rep with generous rest, then complete additional volume on an incline. Over time, those singles can become sets of two, three, and beyond.
A beginner can make noticeable progress in four weeks, but not everyone will complete a full floor push-up within that period. Some women will advance from the wall to a countertop, while others will progress from a low incline to the floor. The timeline is less important than building repeatable technique and strength without pain.
Three nonconsecutive sessions per week work well for most beginners. More frequent practice is not automatically better, especially when sets are challenging. Recovery helps muscles adapt. Experienced trainees may use brief, low-fatigue practice more often, but beginners should first establish consistent form and monitor joint comfort.
The best push-up progression is the one that lets you practice consistently with excellent form. Starting at the wall or a high incline is not a shortcut; it is intelligent strength training. By gradually increasing repetitions, lowering the incline, practicing controlled negatives, and allowing time for recovery, you build the exact qualities needed for stronger push-ups.
Follow the plan for three sessions each week, track the variation and repetitions you complete, and celebrate improvements in control as well as rep count. At the end of four weeks, you may earn your first standard push-up, perform several more than before, or master a more challenging incline. Continue progressing one step at a time, and the strength you build will support both your workouts and everyday movement.
Continue your progress with this complete Push Up Regimen For Women, or extend your training with the 30 Day Push Up Challenge. You can add more equipment-free pressing exercises with the Bodyweight Push Workout, develop total-body fitness through the 4 Week Strength Training Bodyweight Workout Plan, and strengthen the main muscles used during every push-up with this Chest And Tricep Workout For Women.
Stay up to date on the latest women’s health, fitness and lifestyle trends and tips.
