



Sign up for workout ideas, training advice, reviews of the latest gear and more.


Building strength with your body weight does not always require harder exercises, faster repetitions, or longer workouts. Sometimes, the most useful change is learning to lower yourself with control. A deliberate descent during a squat or push-up turns a familiar movement into a focused strength exercise and makes it easier to notice where your technique needs attention. This 4-week eccentric calisthenics workout plan uses that approach across three weekly sessions. You will practice controlled lowering movements for your legs, chest, back, calves, and trunk, with clear options for adjusting difficulty. The program suits women who want a structured home workout, although anyone with the appropriate starting ability can use it.
You do not need to perform full floor push-ups or advanced single-leg squats to begin. Instead, choose variations that let you maintain the prescribed lowering speed while finishing each set with control. Over four weeks, the goal is better movement quality and a manageable increase in training difficulty.
Eccentric training emphasizes the portion of an exercise in which a working muscle produces force while lengthening. During a squat, your thigh muscles help control your descent. During a push-up, your chest and arm muscles help lower your body toward the floor.
Calisthenics uses body weight as the main resistance. Combining these methods means paying particular attention to the lowering phase of bodyweight movements. You might spend three seconds descending into a squat, then stand normally, or lower through a push-up before using your knees to return to the starting position.
Most exercises in this plan include both lowering and lifting. You will lower slowly and return with a smooth, comfortable effort. This keeps the workouts practical and gives you repeated practice through the complete movement.
Negative-only repetitions use a different approach. You perform the lowering phase, then use assistance to reset. A negative push-up is one example: lower from a plank, place your knees down, and use the easier position to return. This can bridge a strength gap, but each repetition should remain controlled.
A three-second lowering phase means counting approximately three steady seconds from the top to the bottom. Avoid dropping quickly through the first half and stretching out the final few inches.
Unless an exercise specifies otherwise, use a three-second descent, no deliberate pause, and a smooth return. Continue breathing throughout the repetition. The timing is a guide for consistent practice; perfect stopwatch precision is unnecessary.
Slowing the descent makes it harder to rely on momentum. It also gives you time to notice whether your knees track comfortably, your shoulders remain supported, and your trunk stays stable.
Eccentric emphasis can make basic exercises more challenging without immediately adding external weight. However, slow repetitions are one training option, and they do not automatically produce better results than every other controlled tempo.
A useful repetition involves a range of motion you can control. For squats, that might initially mean sitting toward a chair. For push-ups, it might mean lowering toward a wall or elevated surface.
As your strength develops, you may be able to use a larger comfortable range while maintaining alignment. Treat that improvement as progress even if your repetition count remains unchanged.
This eccentric bodyweight workout needs floor space, a wall, and a sturdy chair or bench that cannot slide. A fixed countertop can provide a push-up incline. Keep exercise surfaces clear and check stability before every session.
A securely installed rowing setup is optional. Back training is difficult to load effectively with floor exercises alone, so the plan includes an accessible shoulder-control movement and a separate rowing progression for people with suitable equipment.
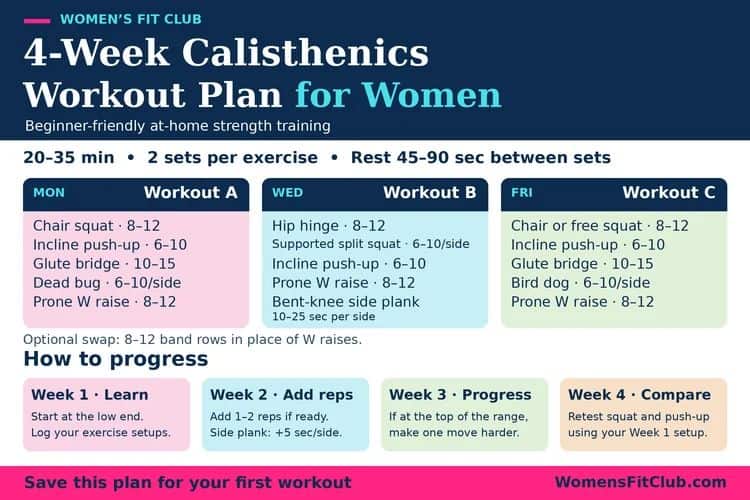
Train on three nonconsecutive days, such as Monday, Wednesday, and Friday. Perform Workout A on the first day, Workout B on the second, and Workout C on the third.
Allow approximately 30–40 minutes per session, including the warm-up. Your pace will vary with rest needs, unilateral exercises, and equipment adjustments. Do not rush the lowering phase to meet a shorter workout target.
In week one, complete two sets of each exercise. In weeks two and three, follow the progression instructions below. Week four reduces volume so you can practice clean repetitions and evaluate improvement without a demanding final test.
Rest 60–90 seconds between most sets. Use up to two minutes after challenging push-ups, split squats, or rows. For exercises performed on both sides, complete one side, switch with a brief transition, then rest after both sides.
Finish most sets feeling that you could perform another two or three repetitions with the same tempo and technique. If the final repetition becomes a rapid drop or requires substantial twisting, the variation is too difficult or the set is too long.
Start conservatively, especially if slow eccentric training is new to you. Unfamiliar lowering work can produce substantial soreness. A tolerable first week makes it easier to train consistently during the remaining weeks.
Spend five to seven minutes preparing for the movements ahead. Begin with easy marching or walking, then perform relaxed shoulder circles, gentle hip hinges, and comfortable ankle movements.
Practice five shallow squats, five wall push-ups, and several alternating steps backward while holding support. Finish with three easy repetitions of the first workout exercise, using a shorter range if needed.
The warm-up should leave you feeling more prepared rather than fatigued. Save long lowering phases and challenging sets for the main workout.
Workout A introduces the basic patterns you will revisit throughout the month. Perform the exercises in order, completing all sets of one exercise before moving to the next.
Stand in front of a sturdy chair with your feet in a comfortable stance. Reach your hips back and bend your knees, lowering for three seconds until you lightly touch the seat. Stand smoothly without bouncing.
Keep your whole foot supported and let your knees move in line with your toes. Use a higher seat or gentle hand support if necessary. If sitting fully makes standing difficult, reduce the descent and practice hovering above the chair.
Place your hands on a fixed countertop or another stable elevated surface. Step back until your body forms a straight line from head to heels. Bend your elbows and lower your chest toward the surface for three seconds.
Press away smoothly while maintaining your body position. Choose an incline high enough that the final repetitions remain controlled. Avoid letting your hips sag or pushing your head forward to create the appearance of extra depth.
Lie on your back with knees bent and feet flat. Lift your hips to a comfortable bridge position, then lower toward the floor over three seconds. Briefly reset and repeat.
Keep your ribs relaxed and avoid arching your lower back to lift higher. The purpose is controlled hip movement. If you feel your hamstrings cramping, lower the height and adjust your foot position slightly before continuing.
Lie on your back with knees bent. Gently brace your trunk and slide one heel away from your body over three seconds. Stop before your lower back noticeably arches, then return and change sides.
This is a trunk-control accessory rather than a pure eccentric exercise. It helps you practice maintaining your pelvis and rib position while a limb moves. A shorter slide is appropriate when the longer version disrupts that position.
Workout B adds a supported unilateral leg exercise. Working one side at a time increases coordination demands, so use support freely and prioritize balance over depth.
Stand in a staggered stance beside a fixed support. Keep both feet planted and lower your body for three seconds by bending both knees. Push through your feet to return smoothly.
Keep your stance wide enough to maintain balance, as if your feet were on separate tracks. Begin with a shallow range. You should not need to force the back knee toward the floor or keep the front shin perfectly vertical.
Lie face down with your forehead supported on a folded towel. Bend your elbows into a W position. Lift your hands and elbows slightly, then lower them slowly over three seconds.
Keep the movement small and your neck relaxed. This exercise practices shoulder-blade control with modest resistance. It does not provide the same pulling load as a row, so use the optional substitution below when appropriate equipment is available.
If you have a properly installed suspension trainer or purpose-built stable rowing station, substitute supported bodyweight rows for the W raises. Pull toward the handles, then straighten your arms over three seconds.
Start relatively upright to reduce difficulty. Follow the equipment’s installation and load instructions. Avoid improvising a rowing anchor from furniture or an unsecured door. If you lack a reliable setup, keep the W raise and consider adding suitable pulling equipment later.
Stand beside support with both feet on level ground. Rise onto the balls of your feet, then lower your heels for three seconds. Let your heels settle before repeating.
Keep pressure distributed comfortably across the forefoot and avoid rolling your ankles outward. Begin on the floor rather than hanging your heels from a step. The larger range offered by a step is unnecessary for this introductory program.
Lie on your side with your lower knee bent for balance. Lift the upper leg a modest distance, then lower it over three seconds. Keep your pelvis stacked rather than rolling backward.
Use a small, deliberate range. If the movement shifts into your lower back or requires swinging, reduce the height. Complete both sides before resting.
Workout C reinforces familiar patterns while adding a hip hinge. Keep this session controlled, particularly if your legs still feel tired from the earlier workouts.
Stand beside support with one foot slightly behind the other. Place most of your weight through the front foot and use the rear toes for balance. Soften your knees and push your hips back over three seconds.
Return to standing with your trunk and pelvis moving together. Keep your back position comfortable and stop before you need to round or twist to reach lower. Without added weight, this is primarily a movement-control exercise with modest resistance.
Repeat the incline push-up from Workout A, or use negative push-ups if you can already hold a strong floor plank and lower without collapsing. For a negative, descend over three seconds, place your knees down, and reset using assistance.
Negative-only floor repetitions are optional. A well-controlled incline push-up remains a useful choice throughout all four weeks. Stop the set if your descent becomes shorter, faster, or uncomfortable.
Repeat the chair squat from Workout A. Use this second weekly exposure to make your descent more consistent, with a light seat touch and a smooth return.
Keep the same chair height initially. If the exercise feels easy, resist changing several variables at once. The weekly progression provides a measured way to increase difficulty.
Repeat the bilateral bridge with a three-second lowering phase. Focus on lowering your pelvis evenly and keeping both feet grounded.
If the exercise remains easy by week three, move your feet slightly farther away only if the position remains comfortable and controlled. You can also retain the original version and improve consistency rather than seeking a harder variation.
Complete two sets of every exercise, using the lower end of each repetition range. Use three-second lowering phases and generous rest. This week establishes the versions you can perform reliably.
Record your incline height, chair height, repetitions, and how the final set feels. Note whether soreness affects ordinary walking or your ability to perform the next session comfortably. These observations guide progression more effectively than chasing fatigue.
If an exercise is too hard, raise the push-up incline, reduce squat depth, or shorten the movement range. If soreness changes how you move, postpone the next demanding session until normal movement feels comfortable.
The first week should leave room for adaptation. Completing fewer controlled repetitions is more useful than accumulating repetitions you cannot lower deliberately.
Keep the same variations and three-second lowering tempo. Add one repetition per set where comfortable, staying within each exercise’s listed range. If you already reached the upper limit, keep your repetitions steady.
For the first two exercises of each workout, you may increase from two sets to three if you recovered well from week one. Keep the remaining exercises at two sets. If recovery was difficult, retain two sets throughout.
Different exercises can progress at different speeds. Your squats may be ready for more work while your push-ups remain challenging. Treat each movement separately.
Do not add a third set and a harder variation to the same exercise this week. A small increase makes it easier to identify whether the extra work suits your current recovery capacity.
Keep week two’s set structure. For one or two exercises per workout, either extend the lowering phase to four seconds or choose a slightly harder variation while keeping a three-second descent.
Suitable changes include a modestly lower push-up incline, a slightly lower squat target, or a less upright row position. Return to the lower end of the repetition range after increasing difficulty.
Avoid making every exercise harder simultaneously. Longer descents increase the duration of each set, and a lower incline can significantly increase push-up difficulty.
If you cannot maintain the planned tempo, return to the previous version. Progress means controlling a greater demand, not merely attempting it.
Return to two sets per exercise and use a three-second descent. Retain your week-three variation only when you can perform it comfortably. Otherwise, use the original version and compare how it feels.
During the final session, compare one squat set and one push-up set with your week-one notes. Use the same setup and repetition target. Look for steadier tempo, smoother returns, greater comfortable depth, or lower perceived effort.
There is no need to test maximum repetitions or train to failure. A demanding test could obscure the improvements you want to observe by adding fatigue.
After the fourth week, continue with another gradual training block. You might build repetition consistency, add appropriate external resistance, or develop a fuller pulling progression depending on your equipment and goals.
On rest days, easy walking and comfortable mobility can keep you moving without adding another demanding strength session. Regular meals, adequate fluids, and sufficient sleep help support training consistency.
Some muscle tenderness can follow unfamiliar exercise, but soreness is not a requirement for progress. Sharp pain, worsening joint discomfort, or symptoms that change your movement are reasons to stop the exercise and reassess rather than push through.
A three- or four-second descent is enough for this plan. Turning every repetition into a ten-second lowering effort can create unnecessary fatigue and reduce the amount of quality work you can complete.
During negative-only repetitions, use assistance to reset. Trying to force a full push-up after you have already reached your strength limit changes the purpose of the exercise and often disrupts technique.
A deeper squat or lower push-up surface is useful only if you can control it. Keep an exercise at its current level until most repetitions look and feel similar.
Yes, provided they select manageable variations. Wall push-ups, high chair squats, supported shallow split squats, and short-range trunk exercises offer accessible starting points. Beginners can also begin with one set during the first session.
No. Pull-up negatives require suitable equipment, a secure way to reach the starting position, and enough strength to control the descent. They are unnecessary for this introductory plan.
Four weeks can establish consistent training and improve exercise control. Muscle growth varies with starting ability, training difficulty, nutrition, and recovery. Longer-term progressive training provides a better basis for judging changes in muscle size.
Yes. Repeat the structure while adjusting one variable at a time. Continue recording your setup and performance so each new block develops from what you can already control.
A 4-week eccentric calisthenics workout plan gives ordinary movements a clear purpose: lower deliberately, return smoothly, and increase the challenge gradually. Three consistent weekly sessions provide repeated practice without requiring advanced skills.
Start with the variations you can manage today. By the end of the month, use your notes to identify stronger positions, steadier repetitions, and the next sensible progression.
To support your 4-week eccentric calisthenics workout plan, explore our guide to Progressive Overload Calisthenics for ways to adjust tempo and exercise difficulty. Improve your pressing technique with our 4 Week Push Up Progression Plan For Women, and discover additional training ideas in our 4 Week Bodyweight Workout Program. After completing this plan, consider our 30 Minute Bodyweight Superset Workout or 28 Day Calisthenics Workout Challenge as options for your next training block.
Stay up to date on the latest women’s health, fitness and lifestyle trends and tips.
