



Sign up for workout ideas, training advice, reviews of the latest gear and more.

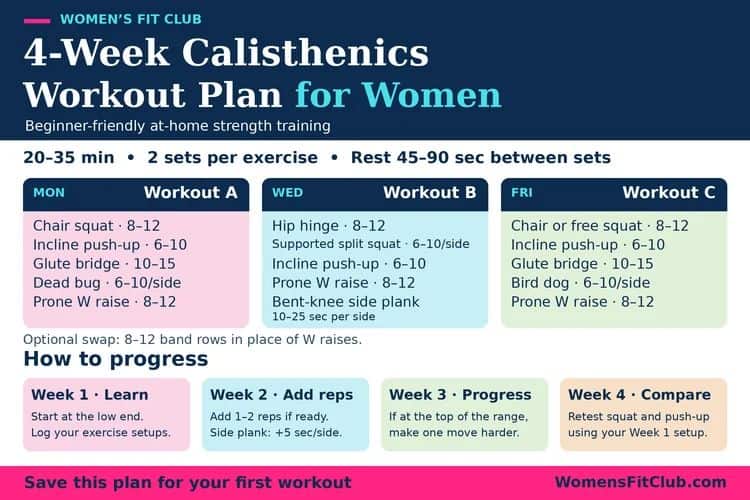


A 4-week calisthenics workout plan for women can start with a chair, a wall, and enough floor space to lie down. This beginner-friendly home program gives you three full-body workouts a week. You’ll practice squats, push-ups, hip hinges, and core exercises, then make them harder at a pace you can control. Each session takes roughly 20 to 35 minutes, including warm-up and rest.
Use the printable PDF to follow the weekly schedule and keep your exercise instructions handy. The first week helps you choose movements that fit your current strength. Over the next three weeks, you’ll add reps, use a slower lowering phase, or try a slightly harder variation. The final workout brings you back to your starting exercises so you can see what changed.
Calisthenics uses your body weight as resistance. A squat asks your legs to lift your body from a lowered position. A push-up asks your chest, shoulders, and triceps to move your body away from a surface. The height of that surface affects the challenge. A wall push-up gives you an accessible starting point, while a lower surface puts more of your body weight through your hands.
This program combines those pushing and squatting movements with hip hinges, bridges, single-leg work, and trunk exercises. It also includes a prone upper-back drill and an optional resistance-band row. The band is useful if you want a pulling exercise with resistance you can increase over time. The floor drill provides a way to practice upper-back movement with the equipment most people already have.
The CDC recommends muscle-strengthening activity for adults on at least two days per week, covering all major muscle groups. This plan schedules three strength days and leaves room for walking or other aerobic activity on the days in between.
Clear an area where you can reach your arms overhead and take a full step backward. Use a sturdy chair without wheels and place it against a wall for sit-to-stands. For incline push-ups, use a wall or a fixed counter that can support your weight. A mat or folded towel can make floor work more comfortable. Keep a timer and something to write with nearby so you can record your reps and push-up height.
Pick three days with a recovery day between sessions. Monday, Wednesday, and Friday work well, as do Tuesday, Thursday, and Saturday. The workouts rotate through A, B, and C in that order every week. If you miss a day, pick up with the next workout when you have time and space the sessions apart. If three sessions are more than your schedule allows, alternate A and B for two weekly sessions and use C when a third day opens up.
Spend about five minutes warming up. March in place for a minute, then alternate easy arm reaches, shallow squats, standing hip hinges, and a few wall push-ups. Before the first working set of each unfamiliar exercise, do two or three easy practice reps. If you train after sitting for several hours, use the first few squats to find a comfortable depth before you settle on a working range.
Finish each strength set feeling as though you could do about two or three more clean reps. In Week 1, leaving three or four is fine while you learn the exercises. A set ends when your next rep would require a noticeably shorter range, a sudden shift in position, or a harder push than planned. For timed holds, stop while you can still breathe steadily and maintain your starting position.
Complete both sets of an exercise before moving to the next one. Rest 45 to 90 seconds between sets and take up to two minutes if you need longer to feel ready. On exercises marked “per side,” finish both sides to complete one set, taking a brief pause between sides as needed. Start with the side that feels less steady and match its reps on the other side.
Start with 8 to 12 chair squats. Follow with 6 to 10 incline push-ups, then 10 to 15 glute bridges. Finish with 6 to 10 dead bugs per side and 8 to 12 prone W raises. If you have a resistance band, you can substitute 8 to 12 band rows for the W raises. Use the same upper-back exercise each time you do Workout A so your log gives you a useful comparison.
The chair squat and incline push-up are your benchmarks for Week 4. On the first day, write down your chair height and push-up surface, along with how many reps you did in the first set. You can also note whether you used your hands to help you stand or chose a smaller range on the push-up. Those details let you repeat the setup even if you progress to a different variation later in the month.
Begin with 8 to 12 bodyweight hip hinges. Do 6 to 10 supported split squats per side, then 6 to 10 incline push-ups. Follow those with 8 to 12 prone W raises or band rows. End with a bent-knee side plank for 10 to 25 seconds per side. Take enough time between split squat sets to feel steady before you start again.
Use a wall or fixed counter for balance during split squats. Set your feet before every set and keep the range small enough to control the bottom of the movement. If your legs feel ready to do more but your balance gives out first, keep the hand support and add a repetition within the listed range. The support lets you train the leg muscles while you practice the movement.
Do 8 to 12 chair squats or free-standing squats, then 6 to 10 incline push-ups. Follow with 10 to 15 glute bridges, 6 to 10 bird dogs per side, and 8 to 12 prone W raises or band rows. Choose exercise versions that leave you enough energy to finish all five movements with control. If you have limited time, do one set of each exercise and record the shortened session.
This workout is a good chance to test one small adjustment. For example, you can move from tapping the chair to pausing just above it on your squat. Try the change on the first set, then see whether you can repeat it on the second set with the same depth and steady breathing. Keep your familiar variations for the other exercises while you assess the new one.
Do A, B, and C on three separate days. Start with two sets per exercise and use the low end of each rep or hold range. One set is enough for the first session if you are returning after a long break or find it hard to keep your form through the second set. Write down what you did so you can tell whether next week’s change comes from better technique, more reps, or both.
For example, your first Workout A might be two sets each of eight chair squats, six wall push-ups, ten bridges, six dead bugs per side, and eight W raises. Record where your feet were for the wall push-up. Moving them several inches can change how the exercise feels, even when the surface is the same. For dead bugs, note whether you tapped your heels close to your hips or reached farther away.
Stay with two sets per exercise and keep the same variations. Add one or two reps per set on movements that felt manageable in Week 1. For side planks, add about five seconds per side if you can keep your hips stacked and your breathing steady. Stay within the listed ranges. An exercise that already feels challenging can stay at last week’s number.
If you did six incline push-ups in both sets last week, try seven in each set this week. If the first set goes well and the second set gets shaky at rep six, log seven and six. That gives you a specific target for your next session. Look for changes you can repeat across workouts, such as a steadier lower on the push-up or the same squat depth from the first rep to the last.
Keep two sets per exercise. Pick one movement per workout that you can perform at the top of its range with two or three good reps left. Lower the push-up surface a little, take three seconds to lower into your squat, or pause for two seconds at the top of your bridge. Use one change at a time. Return to the low end of the rep range when you introduce a harder version.
If no exercise meets that progression rule, repeat Week 2 and use the sessions to make your reps more consistent. For example, a set of eight split squats per side can get more demanding when you remove the bounce at the bottom and maintain the same pace from start to finish. Keeping a written note about tempo helps you compare that set with previous ones.
Repeat Workouts A, B, and C. In Workout A, use your Week 1 chair height and push-up setup for the first set of each benchmark. Stop with two or three reps left, capping the squat at 12 and the push-up at 10. Record reps, range of motion, and how steady the last rep felt. Do the second set with the variation that fits your current strength, then complete the rest of the workout as usual.
Progress can look like eight steady push-ups where you started with six, or the same six with a smoother lowering phase. You might stand up from the chair without using your hands, or finish each split squat at the same depth. If you reach the cap and the set feels easy, your next training block can begin with a harder variation. If your numbers stay the same, compare the setup and rep quality before deciding what to change.
Stand just in front of your chair with your feet roughly shoulder-width apart and toes angled as comfortably as needed. Bend your knees and hips together, keep your feet planted, and lower until you lightly touch the seat. Press through your feet to stand. You can sit fully and reset between reps while you learn the pattern. When you move to a free-standing squat, use the deepest range you can control without your heels lifting or your balance shifting.
Place your hands a little wider than your shoulders against a wall or sturdy counter. Step back until your head, hips, and heels form a line. Bend your elbows and lower your chest toward the surface, then press away. Let your elbows angle diagonally back from your torso. If your hips dip or your shoulders rise toward your ears, use a higher surface or shorten the range. When you can repeat the full set with steady form, a slightly lower surface makes the next progression measurable.
For a glute bridge, lie on your back with knees bent and feet flat. Press through your feet and lift your hips until your torso and thighs form a gentle line. Pause briefly, then lower. If you feel most of the movement in your lower back, use a smaller lift and keep your ribs from flaring. Move your heels slightly closer if your hamstrings take over and cramp.
For a hip hinge, stand with knees soft and push your hips back while your torso tips forward. Keep your weight centered over your feet and stop where you feel a stretch through the back of your thighs. Drive your hips forward to stand tall. To practice, stand a short distance in front of a wall with your back to it and reach your hips toward it. Step a little farther away once you can touch the wall with control.
Take a staggered stance with your feet roughly hip-width apart from side to side. Keep the heel of your back foot lifted and hold a fixed surface for balance. Bend both knees and lower straight down a comfortable distance, then press through your front foot to rise. Keep the same stance for all reps before switching sides. If the movement is awkward, adjust the distance between your feet and test a few shallow reps before starting your set.
For a dead bug, lie on your back with your knees bent over your hips and your arms reaching up. Exhale gently as you lower one heel toward the floor. Bring it back and switch sides. When you can do that without your lower back changing position, try reaching the opposite arm overhead as the heel lowers. Use a smaller range whenever you feel your ribs lift or your pelvis tilt.
For a bird dog, start on hands and knees. Reach one leg behind you and the opposite arm forward while keeping your hips facing the floor. Pause briefly, return to the start, and switch sides. If you wobble, keep both hands down and slide one foot back along the floor. Once you can hold your trunk steady, lift the foot and then add the arm reach.
For the side plank, lie on one side with your knees bent and your elbow beneath your shoulder. Press your forearm and bottom knee into the floor to lift your hips. Keep your shoulders and hips stacked and breathe throughout the hold. Lower when you can feel your hips drifting back or down. Start each side with a fresh setup so your elbow stays under your shoulder.
Lie face down and bend your elbows so your arms form a W. Keep your gaze down and lift your hands and elbows a small distance, gently drawing your shoulder blades together. Pause, then lower. If the movement comes mainly from lifting your chest or arching your back, make the lift smaller. Use slow reps so the upper-back muscles do the work.
For a band row, follow the band manufacturer’s instructions to attach it to a secure anchor at about chest height. Stand facing it, hold both ends, and step back until the band has light tension. Pull your elbows toward your ribs, then reach forward slowly. Choose a tension that lets you stay upright throughout the set. The row adds resistance to the pulling pattern and gives you an option to increase that resistance over time.
Use a high chair or a small range for squats and start your push-ups at the wall. On the split squat, hold the counter and lower just a few inches. If one set of each movement is plenty, repeat that dose for the first two or three workouts. Add a second set when you can finish the session and feel ready to train again on your next planned day. Even when you work at the low end of the ranges, record your variations so you have a starting point for the benchmark.
Start with versions that leave you two or three reps in reserve at the listed counts. That might mean counter push-ups, free-standing squats with a slow lowering phase, and band rows. You can add a third set to one exercise per workout in Week 3 if your two sets are consistent and you have time to recover. Keep the same exercise variation when you add the set so you can see how you respond to the extra work.
Pause the set and check your setup. A higher surface may make push-ups more comfortable for your wrists, and a shorter range may help you find a steady position in split squats. You can substitute a chair squat for the split squat or do standing hip hinges when floor transitions are inconvenient. Stop an exercise that causes sharp or increasing pain. If symptoms persist or you are unsure how to train around an injury, ask a qualified healthcare professional for individualized guidance.
Yes. Use a wall for push-ups, do bodyweight squats through a comfortable range, and use the floor for bridges, dead bugs, bird dogs, side planks, and W raises. A chair helps you gauge squat depth. For the supported split squat, a wall can provide light balance support. If you want progressive resistance for upper-body pulling, a band and secure anchor are useful additions.
You may notice that you can do more reps at the same incline or squat to the same depth more consistently. You might also spend less time setting up a split squat or feel steadier while holding a side plank. Your Week 1 and Week 4 notes give you a way to compare the same movements under similar conditions. Changes in body composition vary with factors such as nutrition, starting point, and activity outside your strength sessions.
Yes. An easy walk on a day between workouts can fit the schedule. If you already run, cycle, or take fitness classes, put your hardest sessions where they leave enough time to recover before your next strength day. If your legs still feel heavy when you start warming up, keep the exercises familiar and work at the lower end of the rep ranges that day.
Use the benchmark results to choose one or two movements to progress. If you finish 10 incline push-ups with several good reps left, try a slightly lower surface and start near six reps. If your chair squats feel steady at 12, try a slow descent or a slightly deeper free-standing squat. Repeat the A, B, and C schedule for another month while recording those changes. That gives you a direct way to build on the work you’ve already done.
Download The Free 4-Week Calisthenics Workout Plan for Women PDF.
Choose your three training days and give Workout A a try. Before you start, note your chair height and push-up surface. After you finish, write down your reps and one thing that would help you set up more easily next time. Keep the printable plan nearby so you can return to your starting numbers in Week 4.
If you’re new to bodyweight training, start with our beginner calisthenics guide for women. For Workout A, use the 4-week push-up progression plan to find a variation you can control and the dead bug core workout to practice keeping your torso steady. As your sets get easier, our beginner’s guide to progressive overload can help you decide when to add reps or try a harder variation. After Week 4, keep building with full-body calisthenics for strength and mobility.
Stay up to date on the latest women’s health, fitness and lifestyle trends and tips.
