


Sign up for workout ideas, training advice, reviews of the latest gear and more.


A good core workout does not have to leave you breathless or rely on endless crunches. The dead bug asks you to keep your torso steady while your arms and legs move. That simple challenge can become surprisingly demanding when you slow down, lengthen a reach, and pay attention to your breathing. This 20-minute dead bug core progression workout starts with basic control and builds toward coordinated movements you can scale to your current ability.
You need a comfortable mat or a folded towel and a timer. There is no equipment requirement, although a small cushion under your head may make the floor position more comfortable. The workout uses four five-minute blocks: a warm-up, a foundation round, a progression round, and a controlled finish. Every movement has a simpler option. The point is to keep moving well, not to force the hardest variation at the end of a timer.
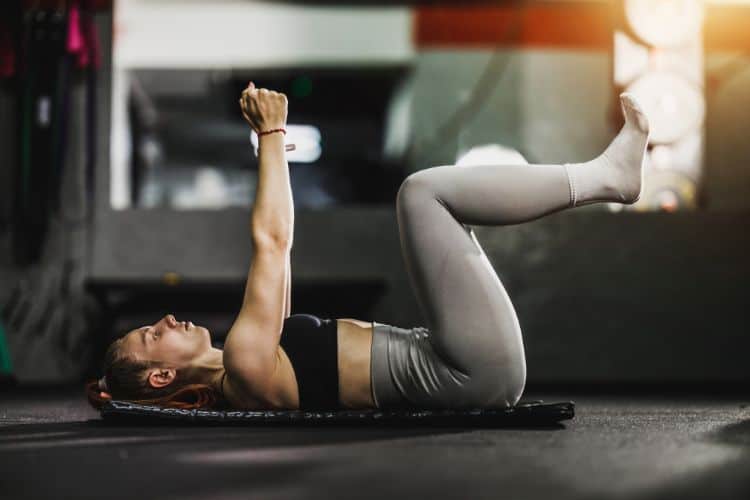
The dead bug is performed on your back, usually with your arms reaching toward the ceiling and your hips and knees bent. You move one limb or an opposite arm and leg away from the starting position while keeping your ribs and pelvis relatively quiet. The movement challenges the trunk to resist unwanted arching or rotation. Your abdominal muscles help create that control while your hip and shoulder muscles move the limbs.
This is a focused core session rather than a complete strength program. Pair it with exercises for your legs, back, chest, shoulders, and hips across the week. You can also use the first few dead bug variations as preparation before a larger workout. If you are returning from an injury, have persistent back pain, are pregnant or recently postpartum, or have been given movement restrictions, ask an appropriate health professional which floor-based core exercises suit you.
Lie on your back with your knees bent and feet flat, about hip-width apart. Rest your arms beside you and take a few slow breaths. Notice where your lower back naturally meets the floor. You do not need to crush your spine into the mat or exaggerate an arch. Think about keeping the front of your ribs stacked over your pelvis, with your head and shoulders relaxed.
Inhale gently before a repetition. Exhale as you move your arm, leg, or opposite pair away from the center. Imagine the exhale helping your lower ribs settle while your torso stays quiet. Inhale as you return to the starting position, or use another easy breath if the repetition is slow. Avoid holding your breath to pin yourself to the floor. Counting quietly can help you maintain a natural rhythm.
Move only as far as you can keep the same relationship between your ribs and pelvis. Your lower back may have a small natural space under it; the goal is to avoid a noticeable increase in arching as your leg lowers. If your back changes shape, shorten the reach, bend your knee more, or set one foot on the floor. These adjustments usually make the exercise more useful than simply forcing your heel closer to the ground.
Set a timer for four five-minute blocks. During the warm-up, change exercises at the minute mark. In the two main rounds, perform each movement for 40 seconds and use 20 seconds to reset. Five movements fill each block exactly. In the final block, use one minute per movement. You may pause the timer if you need a longer break. Quality repetitions matter more than a continuous clock.
Minute 0–1: Supine breathing. Start with both feet on the floor and hands resting along the lower ribs. Inhale comfortably through the nose if that feels natural; exhale slowly and feel the ribs soften. Take several unhurried breaths. Let your neck, jaw, and shoulders relax. You are looking for a starting position you can recreate later, rather than trying to tense every muscle at once.
Minute 1–2: Alternating knee lifts. Keep both feet on the floor between repetitions. Exhale and lift one knee a short distance toward tabletop, then place the foot down without rocking the pelvis. Alternate sides. If lifting the knee pulls your back into a large arch, make the lift smaller and slower. This is your first check of whether the trunk can stay quiet while a leg moves.
Minute 2–3: Alternating arm reaches. Keep your feet planted and point both hands toward the ceiling. Reach one arm slowly overhead only as far as your ribs remain settled, then bring it back. Alternate arms. A shorter range is fine, especially if your shoulders are stiff. Think of the arm moving inside its available range while your torso stays comfortably supported.
Minute 3–4: One-leg tabletop hold. Lift one bent leg above its hip and hold for about two easy breaths, then change sides. Keep the other foot on the floor. Move slowly as you switch, and notice whether one side feels different. If holding the knee up causes strain, do brief lifts instead. There is no need to make the exercise symmetrical by forcing the more difficult side to match the easier one.
Minute 4–5: Tabletop preview. If ready, lift both legs into tabletop for three to five seconds, lower one foot and then the other, and repeat. Keep your arms pointing up or rest them on the floor. If tabletop disrupts your breathing, continue alternating single-leg lifts. This minute helps you choose the starting position for the foundation round.
Work for 40 seconds, then take 20 seconds to reset before the next exercise. Move at a pace that gives you roughly four to eight controlled repetitions per side over a work interval, although fewer are fine. Keep one foot down for any movement if lifting both legs makes you lose position.
Minute 5–6: Alternating heel slides. With knees bent and feet on the floor, exhale and slowly slide one heel away until the leg is more open, then bring it back. Switch sides. Keep the heel in contact with the floor, and stop before your pelvis tips or your ribs rise. This version makes the reach easy to control and gives you a useful fallback for every later leg movement.
Minute 6–7: Bent-knee heel taps. Bring both legs into tabletop if you can maintain your starting position. Lower one bent leg until the heel lightly touches the floor, then return and alternate. Do not throw the leg down or use the floor as a bounce. If tabletop is too much, keep one foot planted and tap the lifted heel down on the same side before switching halfway through the interval.
Minute 7–8: Alternating overhead arm reaches. Keep your knees bent with feet on the floor, or use tabletop if it feels steady. Reach one arm back toward the space overhead, then bring it up and change sides. Your hand does not need to touch the floor. Make the reach small enough that your lower ribs do not pop up. This isolates the arm movement before the opposite-limb pairing begins.
Minute 8–9: Opposite arm and heel slide. Reach your right arm overhead while your left heel slides forward along the floor. Return both together, then alternate. Exhale on the reach and let your head stay heavy on the mat. If the pairing feels confusing, perform two slow arm-only repetitions, then two heel slides, and return to the combination when you feel ready.
Minute 9–10: Foundation reset. Bring both feet down and take two easy breaths. Then practice the opposite arm and heel slide again at a slightly slower pace. Use the final 20 seconds to check your form: Did your trunk stay mostly still? Could you breathe throughout? If the answer is no, make the reach shorter for the next block.
Continue with 40 seconds of work and 20 seconds of rest or transition. These five exercises gradually increase the length or coordination of the reach. Choose the named version only when the previous one feels steady. Your beginner route is to keep one foot on the floor and use the foundation versions as needed.
Minute 10–11: Opposite arm and bent-knee tap. Start with both knees in tabletop and hands over your shoulders. Reach your right arm overhead as your left bent heel travels toward the floor. Return both, then change sides. Maintain the knee bend so the moving leg has a shorter lever. If your back arches, use the opposite arm and heel slide instead.
Minute 11–12: Paused bent-knee dead bug. Repeat the opposite arm and bent-knee tap, but pause for one comfortable count near the farthest controlled point. The pause should feel deliberate, not like a breath-holding contest. Bring the limbs back before your trunk changes position. A short reach with a clean pause can be harder and more valuable than a long reach performed quickly.
Minute 12–13: Partial leg extension. Start in tabletop and reach an opposite arm overhead while you extend one leg forward at an angle. Keep the heel well above the floor, then bend the knee and return. Alternate sides. Straightening the leg increases the demand on your trunk. If that pulls your ribs up or your lower back into a larger arch, bend the knee more or return to the heel tap.
Minute 13–14: Alternating long reach. Repeat the opposite-arm-and-leg movement with a reach length you can own. Extend the leg only as far as your position and breathing allow, and keep it higher if necessary. Take two or three seconds to reach and another two or three to return. The exercise should look controlled, even if you complete only a few repetitions in 40 seconds.
Minute 14–15: Best-form choice. Choose the variation from this block that let you move with the least compensation. Perform it slowly for 40 seconds, then take the final 20 seconds to lower your feet and breathe. This minute reinforces your best current level rather than asking you to finish on the hardest one. Note which version you chose so you can compare it in a future session.
Minute 15–16: Slow opposite-limb reach. Perform your selected dead bug version for up to 40 seconds, then rest for 20 seconds. Aim for a smooth three-count reach and three-count return. If your abdominal muscles are tired, switch to an opposite arm and heel slide. An easier variation done with attention makes a better finish than a longer reach that shifts your pelvis.
Minute 16–17: Single-side practice. Spend about 20 seconds moving the right arm and left leg, rest briefly, then switch to the left arm and right leg. The focused intervals may help you notice a coordination difference. Keep the same reach length on both sides only if both sides can manage it. Otherwise, use the range available on each side without forcing symmetry.
Minute 17–18: Tabletop hold or foot-down breathing. Hold tabletop for short sets of three to five seconds, lowering your feet between sets. Alternatively, keep both feet on the floor and take slow breaths with your hands on your ribs. This is a chance to practice maintaining a position while breathing, not an endurance test. Stop a hold as soon as you feel you need to brace by holding your breath.
Minute 18–19: Gentle knee-to-chest alternation. Place both feet on the floor, then bring one knee toward your chest with your hands behind the thigh if comfortable. Lower it and change sides. Keep the movement easy. You can also stay still with your feet planted if that feels better. There is no need to pull the leg hard or try to stretch through discomfort.
Minute 19–20: Relaxed breathing. Rest with your knees bent and feet flat. Breathe at a comfortable pace and notice how your back and ribs settle against the mat. Roll to your side before sitting up if that feels more comfortable. Your session is complete when you can get up without rushing, regardless of how many total repetitions you performed.
Use a foot-down position throughout the workout. Start with arm reaches, heel slides, and single-leg lifts. You can alternate 20 to 30 seconds of movement with the remainder of each minute for rest. A pillow under your head or a thicker mat may help you settle into the position, but avoid propping your head so high that it strains your neck. The 20-minute structure can stay the same even when the range of motion is small.
First slow each repetition and add a one- or two-second pause while keeping your breathing steady. Next, extend the leg a little farther or lower it slightly, provided your trunk position stays consistent. Only after you can repeat those variations cleanly should you consider a light resistance band or a small ball held between a hand and opposite knee. Added resistance is optional, and it should make the movement more controlled rather than more frantic.
The most common mistake is reaching farther than you can control. As a leg travels out, the lower back arches more and the ribs lift. Fix this by keeping the knee bent, moving the leg higher, or letting the heel slide on the floor. You can place a hand near your lower ribs to notice whether they flare. The aim is not to hold an absolutely rigid body but to limit the changes caused by the moving limbs.
Rushing and breath-holding often arrive together. Slow down until you can exhale during the reach and return without jerking. If you cannot breathe through a pause, the pause is too long or the variation is too demanding right now. Finally, avoid pushing through sharp pain, dizziness, or symptoms that feel unusual for exercise. Stop and seek individualized guidance when a movement repeatedly causes pain.
Try the workout two or three nonconsecutive days per week if it fits your overall training and recovery. You may begin with only the first ten minutes, especially if you are new to floor exercises. On other days, a few quality dead bug repetitions can serve as a warm-up before strength training. Give yourself room to recover if your abs or hip flexors feel unusually fatigued after a new variation.
A simple four-week progression keeps the focus on skill. Week one, use the foot-down options and learn to breathe during every repetition. And week two, try brief tabletop intervals and bent-knee heel taps. In week three, pair the opposite arm with a bent-knee tap while preserving the same rib and pelvis position. In week four, experiment with a partial leg extension or a one-count pause. Repeat a week whenever you need more practice; there is no deadline for earning the next variation.
Your hip flexors help position and move the legs, so some effort there is normal. If they dominate the exercise or cramp, return to heel slides or a single-leg version, keep the moving knee bent, and shorten the set. Check that you are breathing and not trying to hold both legs up for longer than you can control. Persistent or painful symptoms deserve individual assessment.
The dead bug looks simple because you are lying on the floor, yet small changes in reach and timing can make it a demanding core exercise. This 20-minute dead bug core progression workout gives you a way to build from breathing and heel slides to opposite-limb reaches without skipping the control that makes each stage useful. Choose the version that lets you keep a quiet torso, breathe normally, and return with intention. Over time, those clean repetitions are the progress to look for.
For a closer look at setup and technique, read our Dead Bug Exercise Guide. If you want another equipment-free session, try the 30-Minute Beginner Ab Workout, or add planks and bird dogs with the 30-Minute Core Superset Workout. For more comfortable exercise choices when crunches bother your neck, explore these Neck-Friendly Ab Exercises. When you are ready to pair core work with full-body lifting, follow the Strength And Core Superset Workout.
Stay up to date on the latest women’s health, fitness and lifestyle trends and tips.
