




Sign up for workout ideas, training advice, reviews of the latest gear and more.

Resistance bands may look simple, but they can support a surprisingly effective strength program. The key is to stop treating them as warm-up tools and start using them with the same purpose you would bring to dumbbells, barbells, or weight machines. That means selecting challenging resistance, performing controlled repetitions, recording your workouts, and gradually increasing the demands placed on your muscles. This resistance band progressive overload plan provides a structured way to build strength, muscular endurance, and definition without needing a full gym. It can be used at home, while traveling, or as a complement to a traditional lifting routine. The plan is designed around three full-body workouts each week, allowing enough practice to improve your technique while still giving your muscles time to recover.
Progressive overload does not require adding a heavier metal plate every week. With bands, you can progress by using greater tension, stretching the band farther, performing more repetitions, slowing the tempo, improving your range of motion, adding a set, or choosing a more demanding exercise variation. When these methods are applied methodically, resistance band training becomes measurable and sustainable rather than random.
Progressive overload is the gradual increase of training stress over time. Your body adapts to the work it performs regularly. If a workout remains exactly the same for months, the exercises may still feel active, but they are less likely to continue producing meaningful improvements in strength or muscle.
The goal is not to make every workout dramatically harder. Productive overload usually happens through small increases that challenge the body without causing technique to break down. You might complete one additional repetition, move from a light band to a medium band, or add a brief pause at the hardest part of an exercise. Those modest improvements accumulate.
Resistance bands create tension differently from free weights. As a band stretches, resistance generally increases, making the end portion of many movements the hardest. During a row, for example, the band becomes more demanding as your hands approach your torso. During a squat, tension can increase as you stand. This variable resistance encourages you to control the complete movement and maintain good positioning instead of relying on momentum.
A planned routine removes the guesswork from home training. Instead of choosing a few familiar exercises based on mood, you train the major movement patterns across the week: squatting, hinging, pushing, pulling, single-leg work, shoulder training, and core stabilization. This creates a balanced program and makes it easier to recognize whether you are improving.
Bands are also convenient for adjusting resistance. A set with several tension levels lets beginners make small changes without purchasing a large collection of weights. Loop bands work especially well for lower-body exercises, while long tube bands or flat bands are useful for rows, presses, pulldowns, deadlifts, and arm exercises. Door anchors can expand your options, provided they are installed correctly and inspected before every session.
Consistency matters more than equipment variety. A well-designed band program repeated for several weeks gives you time to learn each movement and apply progression. Constantly replacing exercises may feel interesting, but it makes results harder to measure. In this plan, the primary exercises remain consistent while the workload gradually develops.
Choose a band that allows you to complete the target repetition range with controlled form while making the final two or three repetitions feel challenging. If you could easily perform another ten repetitions, the setup is probably too light. If you cannot reach the minimum target without shortening the movement or jerking the band, reduce the resistance.
Most exercises in this plan use a range of 8 to 15 repetitions. Lower-body compound movements may suit the higher end because the legs and glutes can often handle more tension. Shoulder and arm exercises may require a lighter band. There is no reason to force one band level across the entire workout.
Aim to finish most sets with approximately one to three good repetitions still possible. This is sometimes described as repetitions in reserve. It keeps the work challenging while reducing the temptation to turn every set into a maximum-effort test. Beginners may initially stop with three or four repetitions in reserve as they develop coordination and confidence.
Perform the three strength workouts on nonconsecutive days, such as Monday, Wednesday, and Friday. On other days, choose rest, walking, mobility work, or gentle recreational activity. If three workouts are not practical, complete two sessions per week and simply continue with the next scheduled workout rather than trying to squeeze all three into a crowded weekend.
Before each workout, warm up for five to eight minutes. Begin with easy marching or walking, then perform bodyweight squats, hip hinges, arm circles, wall push-ups, and light band pull-aparts. The purpose is to raise your body temperature and rehearse the patterns you are about to train. A warm-up should prepare you, not exhaust you.
Rest for approximately 60 to 90 seconds between most sets. You may need up to two minutes after demanding squats, deadlifts, rows, or presses. Shorter rest is not automatically better. Enough recovery allows you to use productive resistance and maintain technique.
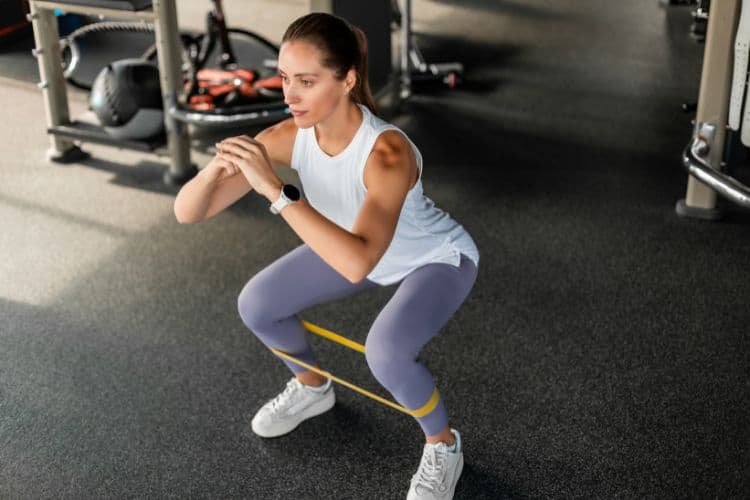
Begin with a resistance band squat for 3 sets of 10 to 15 repetitions. Stand on a long band and hold it at shoulder height, or place a loop band above your knees if you are still learning the movement. Sit your hips down and back while keeping your feet planted, then drive through the floor to stand tall. Increase tension only if you can maintain knee alignment and a comfortable depth.
Next, perform a standing band chest press for 3 sets of 8 to 15 repetitions. Secure the band behind you at chest height, stagger your stance, and press forward without allowing your lower back to arch. Follow it with a seated or standing band row for 3 sets of 10 to 15 repetitions. Draw your elbows back while keeping your shoulders down and your ribs controlled.
Complete a band Romanian deadlift for 3 sets of 10 to 15 repetitions. Stand on the band, hold the ends, soften your knees, and push your hips backward until you feel tension through the backs of your legs. Finish with a Pallof press for 2 or 3 sets of 8 to 12 controlled repetitions per side. Resist the band’s attempt to rotate your torso.
Start with a band deadlift for 3 sets of 8 to 15 repetitions. Use a wider stance on the band or a heavier band when the movement becomes too easy. Keep your spine long, brace your midsection, and finish by standing tall rather than leaning backward.
Perform a resistance band lat pulldown for 3 sets of 10 to 15 repetitions using a secure overhead anchor. Pull your elbows toward your sides and avoid shrugging. If you do not have a suitable anchor, replace it with a straight-arm pulldown anchored around chest height or perform another row variation.
Continue with a band overhead press for 3 sets of 8 to 12 repetitions. Stand on the band and press upward while keeping your ribs stacked over your pelvis. Then perform a reverse lunge with the band held at shoulder level for 3 sets of 8 to 12 repetitions per leg. Beginners can use body weight first and add band resistance after balance and control improve.
Finish with band pull-aparts for 2 or 3 sets of 12 to 20 repetitions and dead bugs for 2 or 3 sets of 6 to 10 controlled repetitions per side. Pull-aparts train the upper back and rear shoulders, while dead bugs teach the core to stabilize the trunk as the arms and legs move.
Begin with a resistance band split squat for 3 sets of 8 to 12 repetitions per side. Stand on the middle of a long band with your front foot and hold the ends near your shoulders. Lower with control, maintaining a stable front knee, and push through the whole front foot to rise.
Perform a band chest press or band-resisted push-up for 3 sets of 8 to 15 repetitions. Choose the version that lets you use a complete, pain-free range of motion. Follow it with a one-arm band row for 3 sets of 10 to 15 repetitions per arm. The unilateral row lets you focus on each side and asks your trunk to resist rotation.
Next, perform a band good morning for 3 sets of 12 to 15 repetitions. Place the band under your feet and around your upper back, then hinge at the hips without rounding your spine. Add band lateral raises for 2 or 3 sets of 10 to 15 repetitions and band glute bridges for 3 sets of 12 to 20 repetitions. End with a side plank for 2 sets of 20 to 40 seconds per side, using a bent-knee version if needed.
The weekly workouts provide the structure, but the following eight-week progression tells you how to advance. Do not rush to the next stage if your technique is still inconsistent. Repeating a week is a sensible training decision, not a failure.
Use a light-to-moderate band and complete 2 sets of each exercise during the first week. Aim near the lower or middle portion of the repetition range. Move deliberately and learn how the band’s tension changes throughout each repetition.
During the second week, keep the same band and try to add one or two repetitions to each set while maintaining form. If you performed 10 squats per set in week one, target 11 or 12 in week two. Avoid increasing everything at once. The first objective is repeatable technique.
Increase the primary exercises to 3 sets. These include the squats, presses, rows, deadlifts, pulldowns, lunges, and split squats. Keep smaller accessory and core exercises at 2 sets if the workouts become too long or recovery declines.
In week four, work toward the top of each repetition range. When you can complete every prescribed set at the top of the range with consistent tempo and two or more repetitions still available, you are ready to increase resistance. Record this milestone instead of relying on memory.
Move to the next band level for exercises you have mastered. Your repetitions will probably drop toward the bottom of the range, which is expected. For example, you might move from 15 rows with a medium band to 9 controlled rows with a heavier band. That is still progress because the muscular demand has increased.
If the next band is too large a jump, shorten the band slightly by widening your stance, gripping closer to the anchor, or starting farther from the attachment point. Make only safe adjustments that keep the band secure. Never wrap a band tightly around your hands or place it where it could damage your skin.
During week six, add repetitions with the new resistance. Keep the same three-set structure and prioritize full range of motion. If a heavier band causes you to shorten every repetition, return to the previous resistance and use another progression method.
Keep the resistance from week six and slow the lowering phase of each primary exercise to approximately three seconds. Pause for one second in a challenging but stable position, then complete the lifting phase with control. A squat might include a three-second descent, a short pause near the bottom, and a steady return to standing.
Tempo increases the time your muscles work without requiring a new band. Because slow repetitions are demanding, stay near the lower end of the prescribed range. Do not use long pauses in positions that cause joint discomfort or compromise balance.
Use normal controlled tempo and try to outperform your week-six numbers with the same resistance. You may add a repetition to each set or improve the quality and range of motion. Do not turn the week into a series of reckless failure tests. The goal is to confirm that the training has made a previously difficult workload more manageable.
At the end of the week, review your log. Compare band levels, repetitions, sets, exercise variations, and notes about technique. Take an easier recovery week if you feel unusually fatigued, then begin another cycle with slightly greater resistance or more advanced variations.
Moving to a stronger band is the most obvious progression. Use it once you can reach the top of the repetition range across all sets with excellent form. Because resistance ratings are not always consistent between brands, track the exact band you use.
Adding repetitions is ideal when the next band level is too difficult. Progress within a defined range, such as 8 to 15 repetitions. Once you reach 15 across every set, increase tension and return closer to 8.
You can make many band exercises harder by creating more stretch before the repetition begins. Stand wider on the band during deadlifts, move farther from an anchor during presses, or shorten the usable length with a safe grip. The change should be small, stable, and repeatable.
Increasing from two sets to three raises total training volume. More is not always better, however. Add sets only when you are recovering well, your technique remains strong, and the workout still fits your schedule.
A slower lowering phase reduces momentum and increases muscular control. Three-second descents work well for squats, split squats, rows, presses, and Romanian deadlifts. Use tempo strategically rather than making every repetition extremely slow forever.
An exercise can become harder without changing the band. A bilateral squat can progress to a split squat, a standing row to a one-arm row, and a regular chest press to a staggered-stance or single-arm press. More complex is not automatically more effective, so choose variations that support your goal and ability.
Write down the date, exercise, band level, anchor position, sets, repetitions, tempo, and any meaningful setup detail. For loop bands, note whether the band was doubled or where it was positioned. For tube bands, record how far you stood from the anchor. These details help you reproduce a workout accurately.
Also record how difficult the final set felt. A simple scale can work: easy, moderate, hard, or maximum. If all sets are easy for two workouts in a row, progress one variable. If form deteriorates or soreness interferes with your next session, maintain or reduce the workload.
Progress is not limited to numbers. A deeper pain-free squat, steadier split squat, better torso position, or smoother press is meaningful improvement. Technique creates the foundation that allows future resistance increases to be productive.
Strength improves between workouts as the body recovers from training. Leave at least one day between full-body sessions when possible. Sleep, daily stress, age, training experience, and other activities all influence how quickly you recover.
Support the plan with balanced meals containing adequate protein, carbohydrates, healthy fats, and micronutrient-rich foods. Protein helps repair and maintain muscle, while carbohydrates can support training energy. Hydration also matters, especially in warm environments or during longer sessions. You do not need a perfect diet to benefit from resistance training, but regular nourishing meals make consistency easier.
Muscle soreness is not required for success. Mild soreness can occur when beginning or advancing a plan, but sharp pain, joint pain, numbness, dizziness, or symptoms that worsen should not be ignored. Stop the exercise and seek guidance from a qualified healthcare professional when appropriate, particularly if you have an injury or health condition that affects exercise.
A resistance band progressive overload plan works when it combines consistency with gradual, recorded increases in difficulty. Bands may be portable and inexpensive, but the principles behind effective training remain the same: use challenging resistance, perform complete controlled repetitions, train the major movement patterns, recover between sessions, and progress at a rate your technique can support.
Follow the three-workout schedule for eight weeks, record each session, and change only one primary variable at a time. Some weeks, progress will mean a heavier band. In others, it may be an additional repetition, a steadier range of motion, or a slower lowering phase. Each improvement moves the program forward.
The best resistance band plan is not the one that leaves you most exhausted after a single workout. It is the one you can repeat, measure, and gradually build upon. With patience and purposeful overload, resistance bands can provide a practical path to greater full-body strength at home or wherever you choose to train.
Continue building your routine with the 30 Day Resistance Band Workout Plan for a longer training challenge, or use this 30 Minute Full Body Resistance Band Workout when you need a complete strength session. You can give your legs extra attention with the 30 Minute Lower Body Resistance Band Workout, choose the 30 Minute Resistance Band Workout at Home for another convenient full-body option, and learn how to apply the same gradual training principles with Progressive Overload for Women Over 40.
Stay up to date on the latest women’s health, fitness and lifestyle trends and tips.
